I love cooking, and food, and cooking food, particularly when I can make more whole or organic foods taste better than a restaurant or a store, so I felt like this would be a good, and perhaps even relaxing, way to do a class assignment. While a little stressful at first, it has been fun to store everything in one place, making sure I'm picking up recipes from their original source, looking for others ideas through the blogs that I link to, and generally learning things in a new way. Particularly for recipes I've borrowed (and then changed up), it has been an interesting way to share information without taking credit for it, which has always been one of my hesitancies about starting just a blog about food.
Through all that sharing, though, there are some things that I just make, or old family traditional recipes I follow that aren't quite the same on someone else's blog or in some website's recipe box. So I figured, as a I final component for my project, I'd create some knowledge for the sharing project. Enter... dMo's 7 Layer Dip.

Photo Credit: My iPhone
I've been making 7 Layer Dip since I was a little girl (like really, in third grade we had to do a demonstration and I made 7 Layer Dip in front of the class), and can't remember a gathering, holiday, birthday, and most recently, sporting event without it (I promise, it is pretty amazing). In fact, sometimes I know my friends invite me solely for the dip (but seriously). I'd like to think that over the 20+ years, I've gotten pretty good at it and picked up some fun tricks along the way. So this is how I'm making 7 Layer Dip in my thirties (I've put the avocado back in, thanks to my grown-up taste buds, whatever was I thinking as a child), which is almost nutritious, pretty to look at, and super tasty! I'm particular about my ingredients but make it how you like!
Ingredients (for an 8x8 pan):
- 1 can Refried Beans (regular, low-fat, no-fat, organic, all cool - I usually use a low/non-fat thats gluten free too)
- Guacamole (3-4 fresh avocados, a little onion, garlic, salt, lime, salsa, a ton of cilantro, just use a knife or fork to smash - if you have to do store bought - Wholly Guacamole is the only way to go)
- 1/2 cup of salsa
- 1 16 oz container of sour cream (it must be regular sour cream, or Trader Joe's Simply Fat Free Sour Cream, regular stores low/non fat mess everything up)
- 2 cups-ish of shredded cheddar cheese (rBST free and grated fresh if you can)
- 2 firm tomatoes (roma, beefsteak, whatevs, just not cherry or grape), diced
- 1 small can of olives, sliced (or buy organic and slice them yourself
- The green parts of a green onion, sliced small
- Lil bit of chili powder (or if you have it, taco seasoning)
After you have all those things, it is pretty easy. Put the can of beans in your dish, cold, add the salsa. Stir around to well mixed and a nice flat layer, have a napkin handy to keep the lines clean if you are using a glass pan like mine. Put in the fridge.
Then make your guac, or really, just the avocado and cilantro, everything else will come together nicely. Leave in chunky, so people know it is made out of real avocados and isn't just some green sour cream, but not so chunky it will break all the chips. Get your sour cream, add a little chili powder into it and stir around (always stir sour cream before doing anything with it). The sour cream should have little specks of seasoning but not look burnt orange.
Grab your pan of beans out of the fridge, and get to layering. Guac goes first, a few scoops in key locations help with a nice even spread. Clean your edges then do the same with the sour cream (you may have leftover sour cream), and use your napkin to clean the edge of the pan. The important thing is to make sure the sour cream covers the guacamole so that it doesn't turn color and stays nice and green without any preservatives. Make sure you clean the sides.
If your cheese is grated, add it now. If not, put the dip back in the fridge and get your other toppings together. I like to cut the tomatoes where a I cut the cilantro, and maybe add a little few specks for flavor (if you are one of those people who think cilantro tastes like soap: 1, I'm sorry, 2. you could also use parsley for this part). Cut all your veggies and start again.
Time to get to sprinkling with your fingers. Cheese goes on like a nice little layer. Then tomatoes, because they are prettiest and the best and you have a lot of them. Then the olives. nice contrast. Finally, just add the green onion for a little pop of additional color.
You can eat it right away (desperate times...), but if you chill it and let everything set it tastes better. Serve with tortilla chips, although I have some friends that swear it tastes better with ridgy potato chips, and a spoon. Check out those layers!
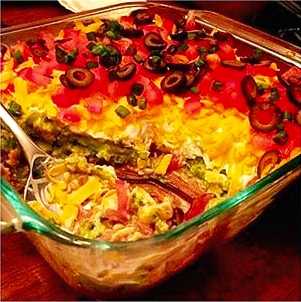
Photo credit: My iPhone

dMo's Musings Blogspot by Danielle Morgan Acosta is licensed under a Creative Commons Attribution-NonCommercial 4.0 International License.
I've had the dip! So good!
ReplyDelete